Saturday, September 29, 2012

Ka-Chow! A "Cars" Birthday Party

It's been about a month since Logan's third birthday party, so I really need to finish these posts. This will be the last one of a series of five posts. If you missed the first four, they were about the hand painted birthday candle, the DIY pull-string pinata that looked like Lightning McQueen, the "Pit Stop" game, and the Pit Passes.

I love coming up with themed parties, and I was very happy with how Logan's Cars themed 3rd birthday party turned out, especially since he was thrilled with it. I consider myself to be creative and it is lots of fun for me to come up with decorations, food, activities, and other things to fit with the theme of the party. I started planning ideas several weeks beforehand, and then I began creating the bigger items about two and half weeks prior to the party. Yes, this took time, but again, it was fun for me. I am not suggesting that every mom needs to do this sort of thing, and my goal is not to make other people feel bad if they don't throw elaborate themed birthday parties. However, if you are the type of person who really LOVES making things and you have the time and the ability, I say go for it. (Since I am home full time, I like to say that I have more time than money, forcing me to come up with less expensive ways to do something. This is really good incentive to be creative.) This is my gift, and I would not do this sort of thing if it was "work" for me. (There are lots of other "cool mom" things that I do not excel at, so everyone has their niche area.) I hope you enjoy seeing the ideas.

The Invitations:
In the interest of keeping it simple, I used this cute animated race track evite. I titled the party, "Welcome Race Fans!" and added this text, "Rev up your engines and race over to {Our Last Name} Speedway because Lightning Logan is turning 3! We will have Cars themed food and fun activities in the fast lane. Be sure to pre-register with the Pit Chief by 8/21 to reserve your pit pass, and don't forget to bring your own pit crew! (No presents are necessary.) 
~ Pit Chief Meg

The Food:
This food for this party was fun to make and it was well received by both kids and adults. The main dish was "Mack's Cheesy Wheels" or homemade macaroni and cheese using wagon wheel pasta (which is surprisingly hard to find) and for some reason I do not have a photo to share. I borrowed the idea from this blog and gave it my own name.

{"McQueen's Fruit Racers" were a big hit. I definitely recommend that you soak the apple slices in water with lemon juice since Red Delicious turn brown quite easily, but I soaked mine and they stayed nice looking. The wheels are made from halved green grapes and they're held on with toothpicks so you will want to watch kids with sharp edges. I found the idea for this snack here.}

{These were my weird brain child and not as popular as other food items. I had seen stoplights made from Rice Krispie treats with frosting and M&Ms and wanted to make a healthier version. So, I bought rectangular crackers, spread them with cheddar cheese spread, used a pretzel stick for the base, and put on slices of grape tomato, baby carrot, and green grape for the colors of "Sheriff's Stop Lights."}

{"Sally's Cozy Cones" are just Nacho Cheese Bugles in a bowl.}

{"Doc Hudson's Chocolate Dip Sticks" are pretzel rods dipped in melted Dove Chocolate Discoveries milk chocolate, because I couldn't bear to use bad chocolate.}
{"Luigi's Spare Tires" are store bought mini chocolate doughnuts stacked up high. I got the idea from here.}

{Please excuse the blurry photo. "Fillmore's Organic Fuel" is really Country Time Lemonade mix with about 5 or six drops of neon green food coloring added.}

Many of the food ideas came from this fun blog. The labels for the food were made in Microsoft Word using this checkered flag border clip art. I used the Magneto font in red for the lettering since it was the closest match I could find for the Cars logo font. For clip art images, I used the following: Lightning McQueen, Sheriff, Sally, Mack, Doc Hudson, Luigi, and Fillmore. I printed these all off on one page, trimmed them down with my paper trimmer, and adhered them to red card stock (first folded over into a card) using clear Con-tact paper. (For "Fillmore's Organic Fuel" I skipped the card stock and just affixed my sticker to the pitcher.)

The Cake:
A few months ago, I found this silicone race car cake pan on clearance at Marshall's for $3, and decided it was perfect for having a Cars themed birthday cake. 
 

{Here is the batter before it went into the oven. Logan asked for "swirl" cake. I found the cake mix at the store and then discovered it is just a yellow or white cake mix and you add in a packet of cocoa powder to some of the batter. I will keep that in mind for the future. Note: I accidentally overfilled the compartments and had to trim the pieces down after baking.}

{Here is the finished cake plus six cupcakes that I made with the extra batter. The cake display is just a piece of cardboard box covered with aluminum foil. I made buttercream frosting and dyed it red using the Wilton no-taste icing color, which I found at Jo-Ann. My biggest concern was getting a true red since I didn't think Logan would be pleased with a pink Lightning McQueen. I am glad I found the no-taste version, though, because I heard that red food coloring can be pretty yucky. Since I forgot to leave some frosting plain white for the eye, I added half a marshmallow with a blue M&M and black decorating gel to finish it. I used black McCormick food coloring from Walmart to do the tires and added red M&Ms to the centers. The lightning bolt is yellow decorating icing and the number 95 was a mix of that along with the red buttercream, I think. Since the cake was actually 12 separate pieces, I had to frost each one individually on all sides (I used an angled spatula, which is very handy) and then push them together to make the car look like one whole cake. This was a little extra effort, but it was worth it when I went to serve cake and didn't need a knife. I just pulled it apart with my hands. This is not the nicest looking cake I have ever made, but I had one very happy little boy, so that was all that mattered to me.}

{A decent pastry bag is nice to have. I used my Dove Chocolate Discoveries one for the cupcakes. The checkered flags I made with free downloadable scrapbooking paper, trimmed into 1" x 3" strips. I folded the paper over itself on a toothpick and secured it with a piece of double sided scrapbooking adhesive.}

{See my directions for making the birthday candle.}

The Decorations:
{My inspiration for this welcome sign that I taped to our front door came from this poster. I decided to skip hand lettering and go with word processing to make it easier for myself. The words "welcome to" and "gateway to Logan's party" are in Brush Script and "RADIATOR SPRINGS" is in Showcard Gothic. I used the word art feature to make all the lettering in outline format. Then I printed it on blue paper and colored in the letters with dark blue and red scrapbooking pens. I "laminated" my sign with two pieces of clear Con-tact paper.}

{To make this sign, I printed this image in Microsoft Word as large as I could and still have it fit on a single piece of paper. Then, I used tracing paper and went over the design with a pencil. I put my traced copy on top of a piece of plain white card stock and then traced over the pencil marks to leave an impression on the white paper. Finally, I went over the impressions with pink and turquoise scrapbooking pens. A ruler was helpful for this. I "laminated" my Flo's V8 Cafe sign with two pieces of clear Con-tact paper and then taped it to a kitchen cupboard so that it was near the food.}

{Making this 3D paper Tow Mater should have earned me a black belt in origami! I will warn you that by the time you cut out all the pieces, fold them, and glue them together, you will have invested about an hour and a half. It was super cute, though, and now he is living in Logan's bedroom on a shelf. Also, if you don't read directions all the way through before starting, I'll give you a tip: you will need brown string of some sort (luckily, I had embroidery thread on hand) for the tow cable, and something to make a hole with (I used a push pin).}

{You may remember this road sign from Logan's construction themed 2nd birthday party.}

{After 3 coats of white paint, I added some black Sharpie, and transformed it into...}

{... this new age-appropriate decoration. In retrospect, it makes less sense for a racing theme, but whatever. I wanted to re-use something, and I did.}

{I also made some hanging decorations for the chandelier with clip art images, clear Con-tact paper, and fishing line. Mostly, I used rectangular images because it was easy to match them up for making them two sided. One that wasn't a rectangle, but did line up well was the Cars logo. Another was the Sarge's Surplus Hut sign, because I actually found images for both sides!}

The Activities:
All of the kids received a "Pit Pass" with their name and photo on it. My husband got one, too, since he asked nicely only his said "Pit Crew." So, naturally I needed to make one for myself, which identified me as the "Pit Chief." My inspiration for this came from here.


I used our plastic bowling set to create a game I called "Tractor Tipping." (I was kind of proud of myself for coming up with this. My original idea was to paint aluminum cans and make it more of a bean-bag toss type carnival game, and then I realized this would be so simple and easier for the kids to play without help setting up.) I printed off several of this clip art image and then cut them out and used clear packaging tape to affix them to the plastic bowling pins. Easy peasy.

The "Pit Stop" game turned out pretty cool. I made it with one side of a dishwasher box, paint, black Sharpie, and some clip art images. See my previous post for more detailed directions.


This one is probably my all-time favorite. I have wanted to do a pinata for awhile, but never wanted to spend the money. I know am I tooting my own horn, but this Lightning McQueen pull-string pinata (formerly a cardboard box and some curling ribbon) turned out so well, that I really, truly amazed even myself. It was really one of those things that I pictured in my head and thought it would either be a spectacular success or a huge failure, and fortunately, it was the former.


Other activities were just having out the car mat and toy cars to play with plus the twisty race car track toy where the two cars spiral down. And, of course, they played outside. The nice thing about planning parties for little ones is that they can easily entertain themselves with very little.

The Thank You Cards:  
Even though the party was over, the Cars theme continued with the thank you cards.
 
{For the thank you cards, I took a picture of the birthday boy with all of his Cars gear and had several copies printed. I used red card stock for the cards and made two per 8 1/2" x 11" sheet. The photos are inserted into clear adhesive photo corners.}

{I made a fill-in-the-blank template for the cards once again using this checkered flag border. The wording says, "Dear ______________, Ka-Chow! Thank you for helping me to celebrate my 3rd birthday! Thanks also for the ______________________________________. I love it! Sincerely, Logan" and it is in the Magneto font. I also added this image of Lightning McQueen.}

{For the front of the thank you cards, I used this image. When I printed in in Microsoft Word, it was almost the perfect size for the card. I only had to trim it slightly.}

Friday, September 28, 2012

DIY "Cars" Party Pit Passes


My fourth blog post about Logan's Cars 3rd birthday party is something fun to do if you have time and I thought it added a special something for Logan and his guests. After arriving at the party, all of the kids received a "Pit Pass" with their name and photo on it. These were created in Microsoft Word and printed on white card stock. The photos were either ones that I had and could make color copies of or pictures I got them from the parents through email or Facebook (with permission first, of course). Some of them I scaled down in Paint before printing them and cutting them to fit into the boxes. (I did this the old fashioned way with scissors and a paper trimmer since I didn't want to frustrate myself with trying to fit them into the boxes electronically before printing each Pit Pass.)

This checkered flag border clip art is what I used to frame the pit passes. I sized it so that two would fit on the page. For the Lightning McQueen image in the top center, I used this clip art I found online. The wording at the top, "Logan's 3rd Birthday" is done in Magneto font, since this is the closest one I could find to looking like the Cars logo font. I used the Word Art feature in Microsoft Word to arc it over the Lightning McQueen image. The first of the three text boxes is for the date, which is printed in red Calibri font and then I added the date of the party in black Magneto font. The second text box says name (red Calibri) and then I personalized each one with black Magneto (as large as it would allow without dropping down to the next line, which varied depending upon the length of the name). For the text box on the right, I decided to have the words face a different direction. I have no clue why other than I thought it was visually interesting. (For the record, I don't know what an actual pit pass looks like, so this whole project is my version.) I wrote the theme of the party, "Welcome Race Fans!" in red Magneto and then PIT PASS in larger black lettering (Calibri). The trophy image with checkered flags is clip art found here.The Piston Cup logo was another clip art image that I scaled to fit onto the banner of the trophy clip art. Then, I made an oval with a number 3 (in Magneto font) and placed it onto the center of the trophy to make it fit with Logan's birthday party.

The finished size is about 6" x 3 1/2". After gluing the photos (printed on plain white computer paper) onto the card stock, I "laminated" each pit pass with two pieces of clear Con-tact paper, and then hole punched them. Lastly, I strung them with black lanyard and the little metal lanyard clips, which I bought at Michael's. I got one spool of black lanyard material and 12 clips for around $3 and this was enough for all the kids at the party (plus my big kid -- the adult one, I mean, who was identified as my "Pit Crew" -- and one for myself the "Crew Chief.") After pricing out actual lanyards, I knew that this was going to save me money, and it didn't add that much time to the project. Overall, I was pleased with how the pit passes turned out, and I thought they were a nice touch for the party theme.

Wednesday, September 19, 2012

DIY Pit Stop Game for "Cars" Party

Here we go: Cars party post #3 is all about the "Pit Stop" game I made from one side of the box our dishwasher came in. I originally found this idea on this website. I think it was made of plywood or something similar, and I assume it was larger and more expensive than my DIY version.


Materials:
  • large piece of cardboard
  • pencil
  • scissors (or craft knife)
  • red spray paint
  • acrylic paint: black, white, yellow, orange, red, turquoise
  • Styrofoam tray for paint (or bowl/plate)
  • round objects (bowls/pans/bottle caps, etc.) for tracing (or a compass)
  • hook and loop tape
  • foam paintbrushes
  • word processing software (Microsoft Word)
  • Mod Podge
  • black Sharpie marker
  • newspaper (to protect work surface) 
  • scrap paper
Directions for Car:
1) Find a large piece of cardboard. I used one side of a dishwasher box. I cut mine with scissors because they were handy. (Although this is probably not the ideal box-cutting tool, it is what I felt safe using around my kids, and it worked fine.) Using one of Logan's Lightning McQueen toys for reference, I sketched the outline onto the cardboard and cut it out.
 

    2) Protect work surface with newspaper. Spray paint the cardboard car cut-out. (I found some very inexpensive spray paint at the craft store that was intended to be used on glass, but for 79 cents I decided it was worth a try. I had no problem with this other than I did it in the garage on a rainy day, and the paint bubbled slightly in a few places since it isn't recommended for use during high humidity.) If you prefer, you could paint it with a brush, but spray painting yields quick coverage and no brush strokes. (Note: I ended up flipping mine over and painting the side without the writing.)

    3) Once paint is dry, draw details like McQueen's eye and eye lid, side windows, headlight, mouth, outlines where wheels will go, etc. and go over them with a black Sharpie marker.


    4) Paint details on Lightning McQueen. White and turquoise for eye, light strokes of white (or gray) for side windows, white for mouth, yellow for headlight, red/orange/yellow graduated for lightning bolt. Allow paint to dry and add additional coats as desired. Touch up black Sharpie marker if needed.

    5) Enlarge this number 95 clip art and print to fit the side of the car. (I also used this clip art image for my Lightning McQueen pull-string pinata.) Apply to car with Mod Podge on foam paint brush.

    Directions for Tires:
    1) Trace and cut out two cardboard circles. (I used a frying pan for my template, and again, cut mine out with scissors. Really technical, huh? See, you can do it, too.)


    2)  Protect your work surface with newspaper. Pour some black acrylic paint onto your Styrofoam tray (or plate/bowl). Paint the circles with a foam paint brush.


    3) Once paint is dry, trace center circles onto your black circles. (I used a small bowl for this.) Paint the center circles with red paint and allow paint to dry.


    4) While paint dries, make your template for the spokes (unless you want to paint these freehand two different times. I did not want to do that.) I used a scratch piece of computer printer paper, and traced that same green bowl, and cut out the circle. Then, I traced a smaller bowl (or maybe it was a jar lid?) for a smaller circle. Next, I folded my circle into eighths. In the center of one fold, along the curved line of the un-cut circle, I drew a trapezoid-type shape. I cut that out and traced it so that I had a total of 8 of that shape. These all need to be cut out. I think the center circle I sketched out freehand, but you could trace a bottle cap or something similar. The very center circle will need to be cut out. I drew dots where I wanted my 5 bolts to be around the center circle and just poked through the paper with a pencil to get the holes started.


    5) Now that the template is made, it is easy to lay it onto your red circle and using a black Sharpie, fill in the cut out areas. Repeat on the other tire.


    6) For the lettering "LIGHTYEAR," I found the closest font in Microsoft Word (Eras Bold ITC, 85 point font) and used the word art feature to make it into block lettering. I was able to fit this 4 to a page (the number I needed) in landscape format. My husband pointed out that the lettering isn't on a slant like the real thing, but I felt this was as close as I could get without having to do hand lettering, which would have taken much too long. I did cut out each letter individually because I thought it would look more finished that way. I laid the letters out the way I wanted them, and then applied them with Mod Podge. Once it was dry, I applied a coat of Mod Podge over the whole tires to ensure a good seal.


    7) To make it so that the tires could be taken off and reattached repeatedly, I used hook and loop tape (I think it is made by 3M). It came in strips. I affixed the two sides to each other and then cut them into 1 inch sections so that I had 6 total (3 per tire). Next, I peeled the backing off of one side of the tape, adhered 3 pieces to the cardboard car, peeled off the backing for the opposite side of the tape, and affixed it to the tire, making sure that the two sides of hook and loop were matching up. I repeated this with the other tire, and then tested them a couple of times to make sure the tires could come up and go back on with relative ease for little hand and not come undone. Fortunately, this worked like I hoped it would.


    9) Enjoy your pit stop game. We just did tire changing, but you could also have kids do minor repairs with plastic tools or have a clean, empty gas can for fill-ups, or other "pit stop" type activities you can come up with (not my realm of expertise). Now, Logan has a big cardboard Lightning McQueen car "living" in his room, and he loves it.

    {The birthday boy changes Lightning McQueen's tires at his 3rd birthday party.}


    Tuesday, September 18, 2012

    Look Mom: No Training Wheels!


    Here is Mia's latest masterpiece, a chalk drawing from last night, entitled, "Turtle Riding a Bicycle." I LOVE this drawing because it is cute and very original. Plus, I am proud because when she announced, "I'm going to draw a turtle riding a bike," she simply did it. She did it without complaining that she didn't know how to or asking me to help her in any way. (I prefer not to help her with her drawings because I want her to learn to solve her own problems.) Note that the safety-conscious reptile is, of course, wearing his helmet. This is one of those examples of art imitating life.

    Starting kindergarten has definitely improved Mia's sense of independence. In fact, she asked us to take the training wheels of her bike this past Friday evening. She got pretty good at braking (and falling without doing too much damage) before bedtime. By Sunday evening, she had figured out how to slow down, turn around, and then keep going so that she was able to race up and down the driveway repeatedly, huge grin plastered to her face. She had even requested that we get out her knee and elbow pads, which she normally passes on, so I saw that as a sign of using common sense to minimize injuries. The helmet is NOT optional, and she knows this. That's why the turtle drawing really made me smile.

    {Mia first practiced riding her old bike sans training wheels on Friday night.}


    {By Sunday night, she was feeling much more confident on her "big girl" bike! In fact, she was going so fast, that most of my pictures were too blurry to use.}


    Monday, September 10, 2012

    DIY Pull-String Lightning McQueen Pinata

    This is the second in a series of posts about the crafts projects I made in preparation for Logan's 3rd birthday party, which had a Cars theme. I had seen an article in Disney FamilyFun magazine that showed great crafts to make with cardboard, including a castle-shaped pull-string pinata. ("Crazy for Cardboard," p. 55, March 2012) I took that thought and combined it with this basic plan for making a car from a cardboard box, and amazingly, I created a very cool pull-string pinata that looked like Lightning McQueen.


    Materials for Basic Box Car:
    • cardboard box (mine was 14.25" x 9.25" x 5.25")
    • pencil
    • scissors (or box cutting tool)
    • tape (I used both clear packaging tape and masking tape)
    Additional Materials for Lightning McQueen Pinata:
    • acrylic paint (red, white, yellow, orange, turquoise)
    • black Sharpie marker
    • ruler
    • Mod Podge
    • clip art/printouts of decals, tires, etc.
    • newspaper to protect work surface
    • paint brushes (foam works well for Mod Podge and large areas to be painted)
    • Styrofoam tray/s to hold paint/Mod Podge (plates or bowls also work)
    • red curling ribbon
    • clear tape
    • pinata fillers (I used Cars themed toys and crayons and candy from Dollar Tree.)
    Directions for Making Basic Box Car:
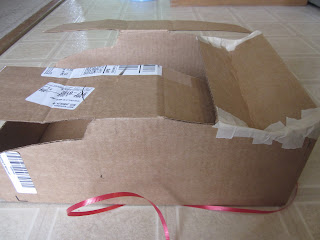
    1. Flatten your box. Draw the basic shape on one of the long sides of the box. There are two sections you will cut out: the front (hood and going up the windshield) and the back end (with slant going up for the tail fin). Do NOT cut the front end of the car (short box side), top of car (which meets up with another long side), or the back of the car (other short side).

    {After cutting out sections from both sides of car}

    2.  Flip the box over and using a pencil, trace around the areas you have cut out to make the car shape. Repeat cut-out process from step 1.

    3.  Once the top of your box car shape is formed and secure, cut a "trap door" into the bottom of the box. I just used the inside edge of one of the flap and then cut 3 sides to form a square shaped flap. Glue or tape one piece of curling ribbon to the trap door. Do NOT tape the bottom together yet.

    {Close-up of "trap door"}

    4. This next step is harder to explain. I folded, shaped (bending a bit at times when necessary), and taped as I went along starting with the tail fin, then the first side, the second side, the top center (where I had to overlap the box flaps somewhat to get them to fit for some reason) to form a 3-D car that looks like the diagram. Note: There was one section that didn't fit together (from where I had cut pieces out) so I had to cut a strip from the extra part of the box, tuck it under the rest of the box, and tape that into place.

    {Starting the process of taping the box car together}


    {Close-up of tail fin as it was taped together}

    {Front view after being taped}
    {Race car box all formed and taped!}
    Directions for Decorating Lightning McQueen Pinata:
    1. Paint the paint with red acrylic paint, leaving the area for the eyes blank. Allow paint to dry and apply additional coats as needed. (It took about 3-4 coats to get good coverage over some of the writing on the box.)


    2.  Once the base coat of paint is dry. Work on the facial details. I used a pencil to draw the eyes and eyelids freehand. Then I traced a bottle cap twice for the eyeballs, after which I traced a button twice to make the pupils. I used white acrylic paint and turquoise acrylic paint to fill in the eyes. Once it was dry, I outlined them and filled in the pupils with black Sharpie marker. I added touches of white paint to the pupils and moved on to the mouth. Again, I drew it freehand with a pencil. I filled in with white paint for the "teeth" and once the paint was dry, outlined and filled in the rest with black Sharpie. The headlights I drew freehand, then I painted the side parts with yellow acrylic paint and the front with white acrylic paint. After that dried, I outlined with black Sharpie. The final detail (other than touching up paint as needed) was to draw the hood outline with the black Sharpie. Once this was all done, I felt like it really had the personality of Lightning McQueen and the rest was just details.


    3.  For Lightning McQueen's tail end, I drew the tail lights and filled them in with orange and white acrylic paints, and then used the black Sharpie for outline work once the paint dried. To make the design on the back I used a pencil and a ruler. The line in the center is about 3 1/2", the ones on either side of it are about 3 1/4", and the outside ones are about 3". They are staggered in a sort of "V" formation. I drew over them 2-3 times to make them thicker and made triangular shapes on the tops and bottoms to give it more definition.

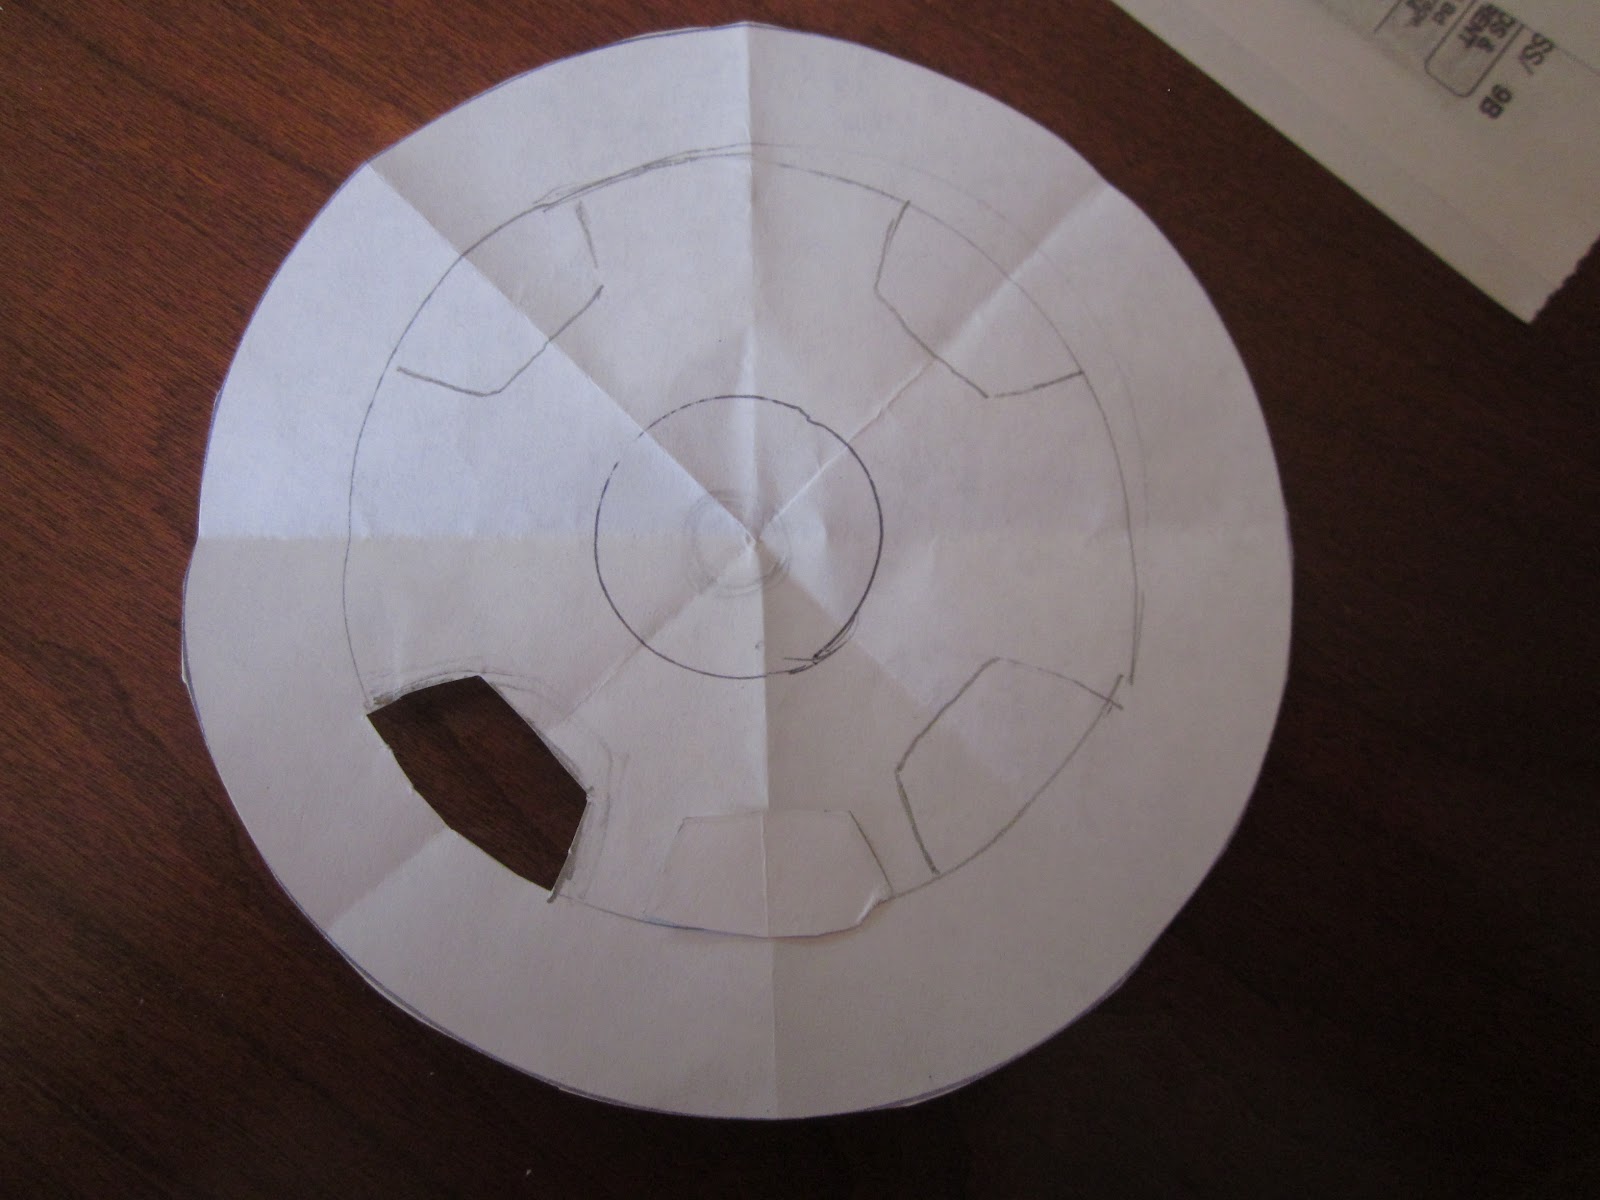
     4. Okay, I promise this is the icing on the cake, and truly not hard at all. The decals are what makes this pinata look finished, and I found everything online and adjusted sizes as needed in Microsoft Word before printing them. For tires, I printed 4 of this image and cut them out. Here is the Rust-eze logo I used for the hood. This is the Rust-eze logo for the tail fin. (It requires a little bit more intricate cutting out.) I used a this number 95 for the top of Lightning McQueen after enlarging it. I enlarged this this lightning bolt for one side of the car, printed it, and cut it out. For the other side of the car, I didn't want it to be backward, so I flipped it in Microsoft Word and printed it out. I knew the 95 would be backward, so I printed off another plain number 95 and cut it out. I had to cut out some of the extra yellow and orange background from the lightning bolt and paste it all together to make it look like the lightning bolt logo (not perfectly but close enough. I used Mod Podge to adhere all of these printouts and then applied extra Mod Podge over top of them all to ensure a good protective seal.

    {Top view}

    {Decorating is done, and it just needs to be made into a pinata.}

    5. Punch holes on either side to allow a string for hanging. (Don't make the mistake I made of trying to do this after filling your pinata.) To make holes, I decided on placement and then pushed a push pin through, following that with a pencil to make the holes wider. Then I knotted one end of a length of curling ribbon, reached inside the box, threaded it through making sure that the knot caught on the inside, brought the ribbon around the outside, threaded it through the other hole, and then knotted it off on the inside of that hole.

    6.  Now add your extra strings for the pinata. (These are not actually attached; only the one string from before is actually attached to the trap door, so only that one string can pull it open.) Make sure you have at least one or two strings per child (I think I made about 20) and cut them around 18-24 inches. Bundle several strings together and slip them into the box along the edge of the trap door so that an inch or so will be held inside -- just enough to keep them in place. I had to do this three or four times to get them all of my ribbon lengths in. Then, carefully close the trap door to make sure that all of the ribbons are inside.

    7.  Fill the pinata and then seal the trap door well enough to hold the treats, but not so well that it won't get pulled open. I used clear packaging tape for this. You are now ready to hang the pinata and have some fun. (Brett hung this one from our swing set.)


    Here is the pinata after it was opened. Everything went really fast, and I didn't get too many pictures. At least it was nice to know that after spending approximately 3 hours on this project, it wasn't going to get smashed with a bat. Logan loved his pinata, and now he has something that can "live" in his bedroom and remind him of his fun Cars party.